Induction Heating
Guide to Induction Heating
This page will discuss the practical side of induction heating to help you understand how to make use of it and how to optimise your system. Induction heating is a method of non-contact heating using high frequency electromagnetic fields. Induction heating only works on electrically conductive materials and the efficiency at which electrical power is converted to heat will vary significantly with different materials.
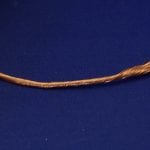
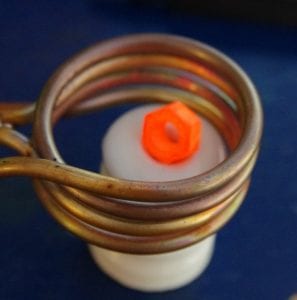 An induction heater heating a steel nut red hot
How does induction heating work?
The heating effect works by inducing a current to flow in a material by exposing it to an alternating magnetic field. This alternating magnetic field is typically in the kHz range and is created using a resonating coil.
When the induced electrical current flows in a material, heat is generated through resistance losses and also hysteresis losses in ferromagnetic materials like iron. Typically, the easiest materials to heat will be of relatively high resistance (but still a conductor), and be ferromagnetic like iron. Low resistance materials like copper and silver can be very hard to heat with induction. When melting silver, for example, it is usually best to heat a graphite crucible and place the sliver inside. This is because graphite is easy to heat with induction and it will then heat the silver indirectly.
One advantage of induction heating is that only the metal parts will be heated and you could, for example, heat a metal part that is totally sealed within a glass container without directly heating the container its self. Other advantages of induction heating include safety (flameless heating), precision, and efficiency.
Working with our induction heater systems
We offer a range of induction heating components for sale which can be used to create a wide range of projects and experiments. Below you will find information to help you get the most out of these and to help you to understand your induction system. We also offer custom electronics design services and consultancy for if you need help making a specific project.
|
|
 |
 |
Transferring Heating Power from the PSU to the Workpiece
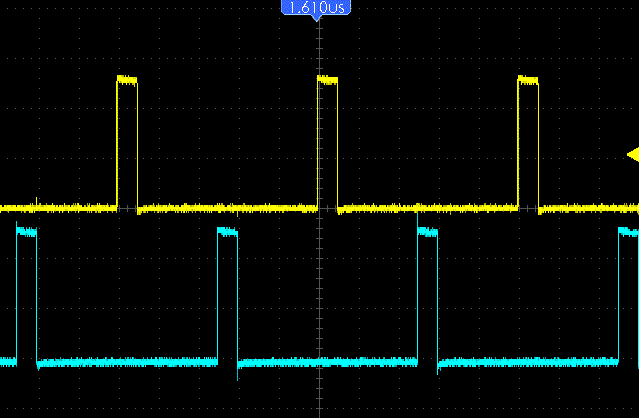
In order to deliver maximum power to a work coil, they are driven at their resonant frequency. Doing this minimises power loss in the driving circuitry and maximises efficiency. The work coil also has a parallel capacitor which forms the other part of an LC resonant tank circuit. Some induction heater systems use a series resonant capacitor and coil, but in this article we will discuss the parallel resonant systems. When being driven at its resonant frequency, energy builds up in this LC tank leading to very high currents. This means that although you may be drawing, for example, 10A from your power supply, there could be 30A or more flowing back and forth between the capacitor and work coil at very high frequency. Because of this, it is important to consider those currents when designing a work coil for your induction heater system.
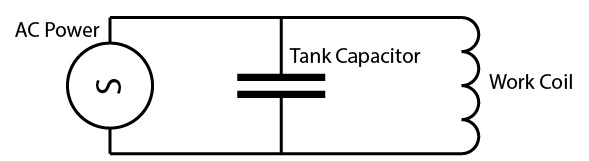
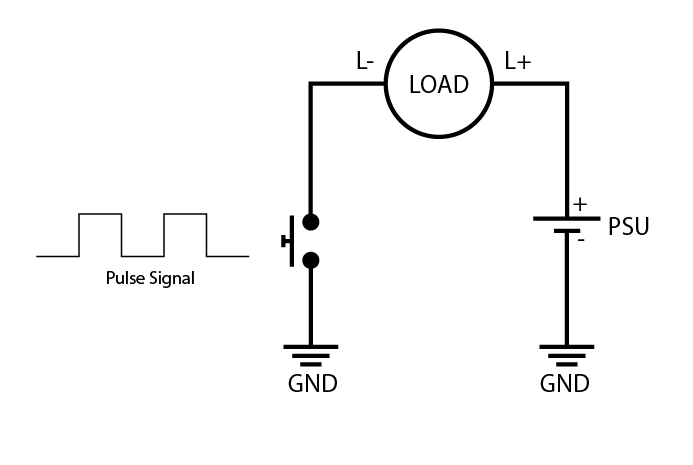
Figure 1: Simplified Induction Heater
It is also important to consider how adding a piece of material into the work coil will alter the amount of power drawn by the system. When the coil is resonating without any workpiece, the current draw from the PSU will be relatively low, but once something is added, it can rise significantly. How much it rises will depend on the total mass, the material from which the workpiece is made, and how close the windings are to the material. For example; in one of our CT-400 coils running from a 15V supply and a driver circuit (such as our CRO-SM2), the current draw could be about 3.5A from the PSU when nothing is in the coil. If we add something like an M6 steel bolt, the current draw will rise to over 10A. Yet if we inserted an M6 stainless steel bolt, the current draw would only rise to around 5A. There would also only be a small change when adding a material like copper. More about the effects of different materials is discussed later.
Also affecting the rise in current when adding a workpiece is the magnetic coupling. A large coil and a small workpiece will show only a relatively small rise in current, whereas a small coil surrounding the same workpiece would allow the current to increase significantly. When adding ferrous materials like Iron, the magnetic coupling is increased and this makes them much easier to heat. However, when such materials reach a high temperature, they will lose their magnetic properties due to something called the Curie Effect. At this point you may see the PSU current drop, and it will become more difficult to increase the temperature further.
The rise in current from the PSU when adding a workpiece to the coil is an excellent indicator of how effective the heating will be. It is therefore important to balance all these factors when considering a coil design for a particular induction heating project.
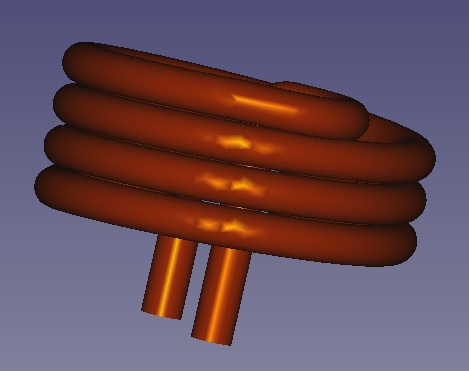
Another important consideration is parasitic elements in your circuit. These are small elements of inductance, resistance and capacitance that are not deliberately chosen to be there, but are a product of the physical nature of components (such as the connecting wires). Since these parasitic elements can cause losses and interference, it is important to reduce or control these as much as possible. A simple parasitic element would be the resistance of the metal in the wire or pipe used to make a work coil. This resistance will cause the coil its self to heat up when current flows in it so it is important to minimise this loss by using thick, high-quality wire. Another issue to consider is the skin effect. This is a phenomenon where high frequency currents tend to flow mainly on the outer surface of a conductor. This means that if using ordinary wire to make a work coil, a large amount of the conducting copper is never actually used and it therefore has a higher parasitic resistance. The skin effect can be minimised by using specialist cable known as Litz Wire. This has multiple insulated strands of wire twisted together to prevent the current being pushed to the outer surface. You can find Litz wire for sale in our shop. Sometimes it is not practical to use Litz Wire so it is common to use copper pipe as water can be pumped through it to keep it cool. This is typically the best method when heating things red hot as the radiated heat from the workpiece would melt the insulation in a litz wire.
The parasitic resistance in a work coil will cause the coil to heat up, waste power, or even overheat and melt. Another effect the resistance has is to reduce the Q factor of the resonant tank. This is important as the current resonating in the tank is roughly the input current multiplied by the Q factor. The parallel capacitors also have some parasitic resistance so it is important to choose ones that not only have a low resistance (known as ESR), but also capable of handling high currents at high frequencies. A common method of minimising parasitic ESR is to use an array of smaller capacitors connected in parallel so that the current is shared between them and the resistance is reduced overall. We have a range of suitable induction heater capacitors for sale in our shop.
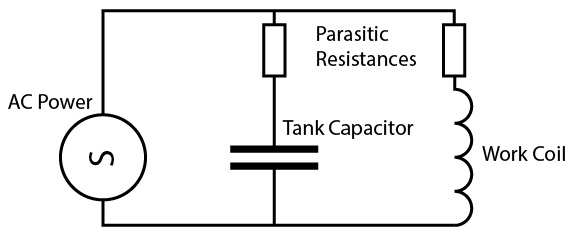
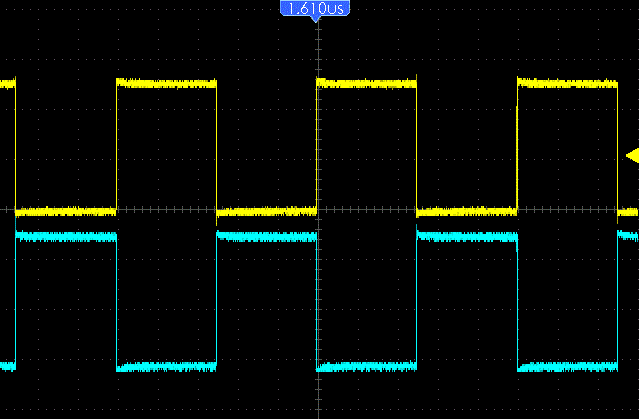
Figure 2: Parasitic Resistance in an Induction Heater
Another important parasitic element is inductance. Any current carrying conductor will have some inductance which causes a resistance to change in the current flowing in the circuit. In an induction heater, this can both be useful, and harmful, depending where in the circuit the inductance is.
The LC tank circuit has a specific resonant frequency at which we drive it for maximum efficiency. However, other small inductances and capacitances in the connecting wires also have natural resonant frequencies that may differ from that of the LC tank. This can create harmonic frequencies which trick the driver circuit in to oscillating at the wrong frequency, or a mixture of several frequencies.
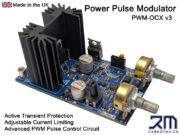
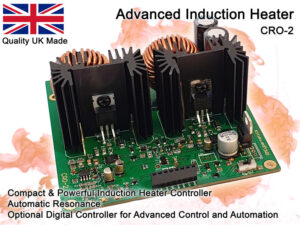
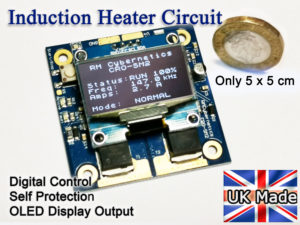
A ZVS driver like our CRO-SM3 and CRO-2 can be vulnerable to latching onto parasitic oscillations, so it is important that the layout and connections between the work coil, tank capacitor, and driver circuit are made carefully.
Long leads between the driver circuit and the LC tank will create significant parasitic inductances. Consider that a typical work coil like our CT-400 may only have 100cm of copper pipe making up the whole coil. If you have 25cm connecting wires between the CT-400 and the driver circuit, this adds another 50cm of conductor with an inductance of its own. This inductance is not part of the LC tank as it is before the tank capacitor so any resonance from it will be detrimental to the system.

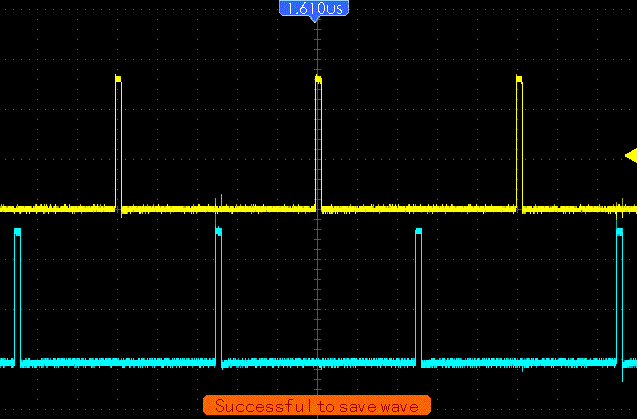
Figure 3: Parasitic Inductance in an induction heater
If we move the tank capacitor to the other side so it sits between the connecting wires and work coil, the problems with mixed frequency resonances will be mostly eliminated as the inductance of the wires now basically forms part of the work coil. However, this means that those connecting wires will also carry the same high currents as the work coil and will heat up if they are not suitably large. In a water-cooled coil this can be quite impractical to do.
It is possible to mitigate some of the parasitic resonance by adding more tank capacitance at the output terminals of the driver circuit, between the circuit and the connecting wires. This can reduce the high frequency ringing cause by the leads and help the driver to lock on to the correct frequency.
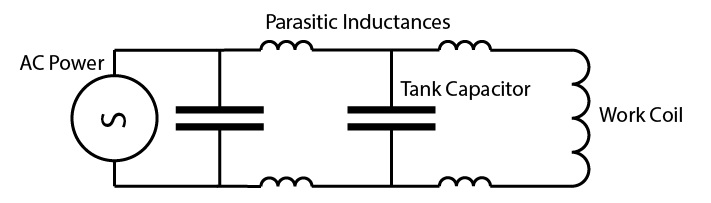
Figure 4: Split Tank Capacitor to compensate for long leads
There are also parasitic inductances and capacitances in the driver electronics themselves. These can be much harder to deal with as they are mostly just part of the physical nature of the components. These parasitic elements become much more significant when driving very high frequency coils, and much less so at low frequencies.
In all cases it is necessary to make trade-offs in the system design based on what is practical, the power requirements, target frequency, efficiency, and cost. If you need any help working out what is the best way to approach your system design, please get in touch.
Induction Heater Coil Design Tips
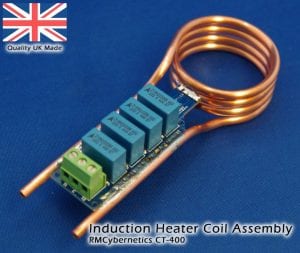
The work coil design is critical for achieving maximum performance in any induction heating project. While a simple work coil like our CT-400 will suit a range of applications, if you want to make use of every watt, then the work coil must be designed to suit your project.
There are a few fundamental work coil shapes commonly used in induction heating. Their shape is chosen to maximise coupling and power transfer to the workpiece as well as being practical to use.
The first thing you should consider when looking at an induction heating project is the power requirements. To heat a known mass of material in a known time is relatively easy to calculate. You can use our handy heater power calculator to get a rough idea. When using this you should consider the efficiency of the power transfer from PSU to heat in the workpiece, and also the heat lost as IR radiation. A hot metal part will be radiating a large amount of heat into the atmosphere if it is not insulated. If we are melting jewellery in a graphite crucible, the entire thing can be insulated making for a very efficient process. If we are heating stainless steel in open air, then we not only have the low power coupling, but also the radiated losses to consider.
 |
 |
 |
 |
Helical Induction Coils
A typical cylindrical shape coil that creates a heating field within the inside of the cylinder. These are easy to make and will transfer power efficiently to materials within.
Pancake Induction Coils
Commonly used in induction cookers as they offer good coupling to the base of the saucepan. To be effective, the workpiece (like a saucepan) must be very close to the coil.
U-Shaped Induction Coils
These are basically a pancake coil that has been folded over. They are common for induction hardening of blades as it is easy to pass the blade through the coil while limiting the heating to only the edge.
There are many other sorts of induction coil shapes, often custom made just for one specific application. Please feel free to get in touch or post a message below if you want to discuss a custom induction heater coil design.
The work coils job is to transfer power from the system PSU to the workpiece (material being heated). Generally speaking, we look at the combined coil and workpiece as a single transformer with the work coil being the primary coil, and the workpiece being a secondary coil (consisting of just one turn). We can use this approximation when making calculations as the current flowing in the secondary coil of a transformer is proportional to the current in the primary coil multiplied by the number of turns. While this sounds simple, it can be more complex in practice as we also must consider the resistivity of the workpiece and the electrical impedance of the work coil.
In a typical helical (cylindrical) coil the magnetic flux density is not homogenous throughout its volume. Most of the flux is concentrated near the outer edges of the volume within the coil. This means that if placing a small part in a large coil, it will absorb more power if placed within the inside edges rather than in the centre of the coil. There is also a lower flux density at each end of the coil. When the workpiece is made from a ferrous material, it will actually change the way the lines of magnetic flux form within the coil, dragging them into itself and improving coupling. If heating something made from multiple materials, this effect should be considered as the flux may be diverted into or away from the other materials.
Induction Heating Different Materials
Which material works best for induction heating? The material a workpiece is made from will significantly affect its ability to rise in temperature within a high frequency magnetic field. Here we will compare a few materials and discuss how we can optimise our system to get the greatest heating effect. Iron typically works best in an induction heater with a power transfer of more than 90%. Copper on the other hand, will only make use of around 15% of power in the system. We typically think of metals being heated with induction, but other materials that can be heated too as long as they are significantly electrically conductive, but also have some resistance.
The main factors influencing the heating efficiency are magnetic coupling and resistivity. While heating due to resistance losses is proportional to I2R, this does not always translate directly in an induction heater system. For example, copper has a low resistivity and could therefore have a high current flowing within the material. However, the impedance of the driver limits power that can be delivered, while to current flowing in the copper will create a back emf in the work coil, also limiting the input power.
An important factor to consider when heating larger volumes, is the thermal conductivity of the material. As high frequency induction heating only heats the outer surface directly (due to the skin effect), the remaining mass of material is heated mainly by the internal conduction of heat from the surface. In larger induction furnaces, lower frequencies are used so that there is deeper penetration of the heating currents.
Below you can find a table of a few common materials and some of the relevant properties that may be considered when used in induction heating.
| Material | Resistivity ρ (μΩ•m) at 20 °C | Relative Permeability μ / μ0 | Heat Capacity (J/g C°) | Density g/cm3 | Thermal Conductivity W/(m K) |
| Iron | 0.1 | 5000 | 0.449 | 7.85 | 80 |
| Stainless Steel (316) | 0.74 | 1.004 | 0.502 | 8 | 16.3 |
| Stainless Steel (304) | 0.72 | 1.6 | 0.5 | 7.982 | 16.2 |
| Nickel | 0.0699 | 325 | 0.461 | 8.902 | 92 |
| Tungsten | 0.056 | 1 | 0.132 | 19.45 | 174 |
| Copper | 0.0168 | 0.999 | 0.385 | 8.96 | 386 |
| Cobalt | 0.056 | 60 | 0.435 | 8.9 | 69 |
| Titanium | 0.42 | 1 | 0.523 | 4.52 | 17 |
| Graphite | 3.75 | 0.999 | 0.717 | 2.66 | 247 |
| Brass | 0.7 | 0.999 | 0.375 | 8.565 | 96 |
| Gold | 0.0244 | 0.999 | 0.129 | 19.32 | 310 |
| Silver | 0.0159 | 0.999 | 0.235 | 10.497 | 419 |
| Aluminium | 0.0282 | 1 | 0.897 | 2.705 | 239 |
| Tin | 0.109 | 1 | 0.218 | 7.26 | 67 |
| Zinc | 0.059 | 0.999 | 0.377 | 7.068 | 113 |
| Lead | 0.022 | 0.999 | 0.129 | 11.29 | 35 |
Table 1: Important parameters of materials when used in Induction heating
* Values can vary significantly depending upon the exact composition, crystal structure, orientation, frequency and temperature. Where a range of values was given in the source, the value here is the average.
Data in this table is collated from numerous sources including those found below:
https://www.engineeringtoolbox.com/specific-heat-capacity-d_391.html
https://www.engineersedge.com/materials/specific_heat_capacity_of_metals_13259.htm
https://sciencenotes.org/table-of-electrical-resistivity-and-conductivity/
https://www.electronics-notes.com/articles/basic_concepts/resistance/electrical-resistivity-table-materials.php
https://www.azom.com/article.aspx?ArticleID=2868
https://www.engineeringtoolbox.com/permeability-d_1923.html
https://onlinelibrary.wiley.com/doi/pdf/10.1002/9781118936160.app2
https://theengineeringmindset.com/density-of-metals/
https://www.angstromsciences.com/density-elements-chart
https://www.sciencedirect.com/topics/engineering/thermal-conductivity-coefficient
https://www.researchgate.net/figure/Relation-of-relative-permeability-of-304-and-316-at-a-low-magnetic-field-strength-and_tbl1_2696949207
Iron (Nickel & Cobalt too)
Iron is an excellent induction heating material for several reasons. Iron is a ferromagnetic material which basically means it is attracted to magnetic fields and thus pulls the magnetic field lines towards it creating a higher concentration within. This basically increases the magnetic induction field strength and creates a high level of magnetic coupling between the coil and workpiece. Good magnetic coupling means an efficient power transfer from the system to the workpiece being heated. Ferrous materials can be magnetised like the way you can magnetise a screwdriver tip by passing it by a magnet. In a high frequency induction field, the material is being magnetised in one polarity and then another, over and over. This creates further heating through hysteresis losses. However, once iron gets really hot, it will reach the Currie Point and these magnetic advantages disappear. After this it is the resistance losses that will be driving any further increase in temperature. Iron has a relatively high resistivity (it doesn’t conduct well compared to copper wires), and this increases with temperature. This high resistivity means that more heat is generated by the induced currents as the heat generated is proportional to I2R (current x current x resistance).
Stainless Steel
Stainless steel can be heated by induction, but compared to mild steel or iron, it has some significant disadvantages. Being only very slightly magnetic, there is a low amount of coupling between the coil and workpiece, so it is important that the work coil form is close to the shape of the part being heated. It does however have a high resistivity which also increases with temperature so this does help it to generate heat from induced currents.
Carbon
Carbon is an interesting material for induction heating as it is a non-metal, yet can conduct electricity. It has a high resistivity compared to metals which actually helps in the heating process making it much easier to heat than stainless steel. Other forms of carbon such as graphite, graphene, and even diamonds can be heated with an induction heater. Carbon is much less dense than many metals and therefore the same volume of carbon would heat much more quickly than a metal part the same size. This low density is what makes it a lightweight material and means that it will take less energy to raise or lower its temperature for a given volume.
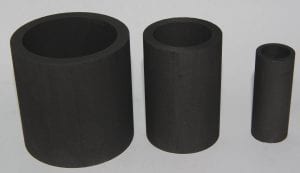 Graphite crucibles used for induction heating
Tin & Tungsten
Tin and Tungsten have a high resistivity and will heat well in an induction heater field. Tungsten however is extremely dense and therefore has a large heat capacity. Being very dense, it has a small volume for a given mass which means within the same sized work coil, it will intersect fewer magnetic field lines than a material of lower density such as Tin.
Copper & Aluminium
Copper and Aluminium can be heated in an induction heater, but the efficiency of doing so is very low. As good conductors of electricity, their low resistivity means lower resistance losses from the induced currents. However, like other metals, the resistivity increases with temperature and heating becomes more efficient as it gets hotter.
Precious Metals (Gold and Silver)
Silver being the most conductive element is extremely hard to heat directly with an induction heater. To heat precious metals, it is usually best to place the metal within a graphite crucible so that the magnetic field heats the crucible, and this transfers the heat to the metals via conduction and IR radiation.
Other Non-metals
There are a number of non-metals that can be heated with induction. This can be semiconductors, ferrites, and other compounds.
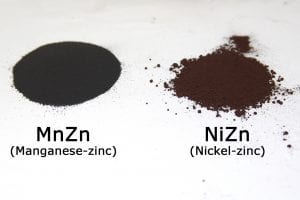 Ferrite Powders used for Induction Heating
Ferrites have multiple uses in induction heating. MnZn Ferrite can be used for magnetic shielding or to guide the path of magnetic flux. Others like NiZn ferrite can be mixed into materials and heated up like metal. NiZn nanoparticles can be absorbed by biological systems and then heated by external fields. This allows heat to be delivered inside certain cells, but without heating the whole lifeform.

 Diffraction is the phenomenon where waves can be bent around obstacles. When coherent light passes through a fine slit some of the rays are diffracted. The varying levels of diffraction cause part of the beam to interfere, thus producing an interference pattern.
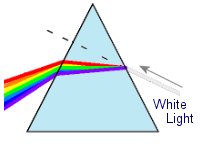 When light enters a denser medium is effectively slowed down. This is due to the light being repeatedly absorbed and re-emited by the atoms in the material. This slowing of the wavefront’s causes the beam to be bent at an angle dependent on the material and the wavelength (colour) of the light.
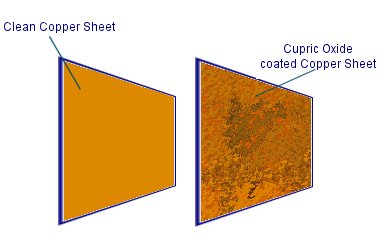 One sheet of copper is given a coating of cupric oxide as this semiconductor will convert sunlight into electricity. To do this a copper sheet is heated over a hob for around 30 minuets. When the sheet has turned black it is allowed to cool. As it cools down the black copper oxide will start to crack up and come off. this is because the materials underneath are contracting at a different rate. it is usually necessary to finish removing some of the black copper oxide by hand.
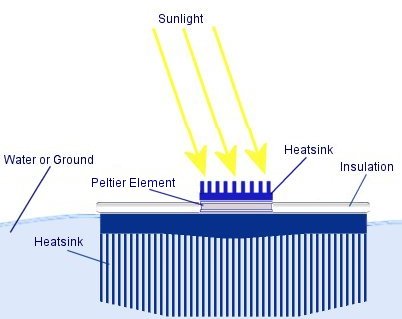 They are commonly used on processors as they can move heat away from a source under electrical power. When connected to a DC power supply a peltier element will heat up on one side whilst becoming cold on the opposite side. A large heatsink is necessary to dissipate the excess heat so that the other side can remain cold.
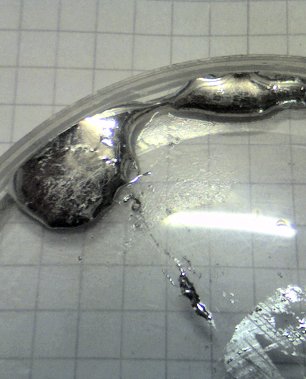 Most metals are a tough solid material at room temperature, but some metals can be liquids. The most obvious one is the element Mercury, which has a melting temperature of -38.83 °C. When certain metals are mixed together they can form what is known as an alloy. The atoms of the various metals will bond together to form the new metal which may have unique properties. Below you can learn how an alloy can be made at home which will melt in hot water. The alloys melting temperature is less than that of any of the original metals.
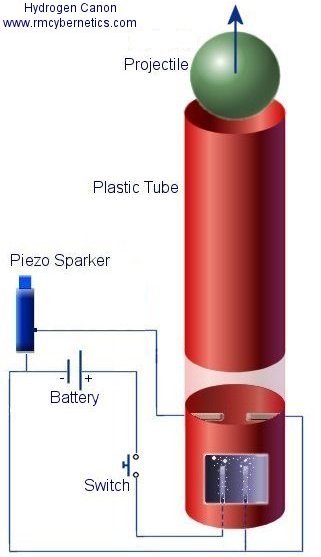 This experiment demonstrates the splitting of water into Hydrogen and Oxygen by electrolysis, and the re combining of these elements in an energetic reaction.