Jacobs Ladder
Jacobs Ladder
A variety of high voltage transformers can be controlled by our Power Pulse Modulators. A Jacobs ladder is a great way to show off the output from the high voltage transformer. We recommend using our PWM-OCXi (v2) for this as driving an ignition coil at high power is very hard on the electronics. While our PWM-OCmi can drive a Jacobs ladder, it can be all too tempting to turn it up just a little too high which could damage the circuit.
When using the OCXi (v2) set the current limiter to about 3 amps as this will help to reduce the heating in your ignition coil and allow it to run longer.
The Jacobs ladder its self simply consists of two metal rods, or stiff wires that are mounted vertically and with increasing spacing towards the top.
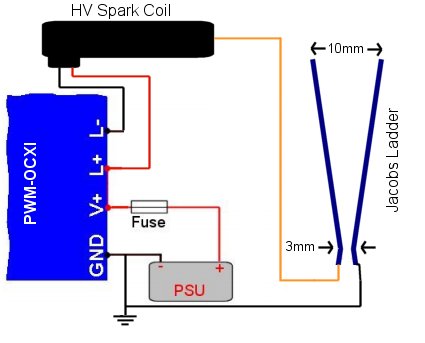
The arc will rise slowly to the top because it is heating the air around it which becomes less dense. It is important to get the spacing right so that it will work properly. If the top is not far enough apart, the arc will get stuck there and not start again. The bottom gap must be close enough so that the arc can jump and get started.
Also notice in the diagram that at the bottom of the Jacob’s ladder, the electrodes move apart again. This is important so that the arc will start above the surface it is mounted on and allow air to get underneath.
The air around it should be quite still or it will disturb the effect. You can place a transparent cylinder around it to block any draughts and for added safety.
Make sure your power supply is earthed, and that you add plastic covers to the control pots for safety. Different coils will respond differently at different frequencies but typically about 400Hz to 1kHz is effective.
We suggest using a PWM-OCXi (v2), a High Voltage Spark Coil, some Control Covers, Fused Croc leads and some Mini Spade connectors.